Check out my Etsy shop!

Monday, December 19, 2011

Away in a manger

I have been trying to think of something that my grand kids could make when they come to visit on Christmas eve.  They are always excited to make something and because of the excitement of the day and what we are celebrating, I came up with this idea.  I was looking for a wooden X to start the project but all of the craft stores only had just a few and I needed 9! As I looked at all of the wooden shapes,  I saw a cross and realized that it would work!  I also thought it interesting that because I was making something to celebrate Christ's birth that the manger would be made from something that he left this life on, (a cross). I used a ruler to make a straight line and used a table saw to make the cut.

I then needed something to use as the cradle for the manger and used a small rectangle of burlap for this.

To make the body of baby Jesus I used some white felt, about 1 1/2 inches by 6 inches. I rolled it up and secured it with some fabric glue.

I used some wire to be used to hold the star, I found the stars at Michael"s and they were just the right size.

I used a small wooden bead for the head and added some wisps of hair to cover the hole of the bead.  I put the heads together ahead of time because it would just be easier than having each grandchild paint and glue the hair.

I used some white flannel to swaddle this little child used some glue to keep Him wrapped and a button was added with glue to the swaddling. (just because I thought it was cute.)

I used some excelsior ( the hay for the manger) and put it all together.

I did add a small wooden base and because it makes the manger a little more stable. (is that a play on words?) I then painted them a yellow gold color.
I made a small hole for the wire to be attached and used some glue to keep it secure.

I then attached the star to hang over the Christ child. I think it turned out perfect and hopefully will help my grandchildren remember why we are celebrating this wonderful day. I think they will have dun putting them all together.
Merry Christmas!

Tuesday, December 13, 2011

Wrap it up!

I had to show you an update that I did to my Christmas decorating.  Remember the pictures that I wrapped at Halloween because they didn't quite go with the Halloween decor? Well, I decided to do the same to the pictures by wrapping them as Christmas gifts.  See how easy it is to change the look of your pictures!  You could match the paper with any color you wanted and it is a cheap way to update some of your pictures for certain holidays.

See how quick you can update and match whatever is in your room!

Love how quick and easy this was to my Christmas decorating!

Sunday, December 11, 2011

Merry Christmas home tour

I think I am about decorated! Welcome to my Christmas home.  We will start at the front door.  Funny how when you see it is pictures you will see what  you for got, (like hiding the wire that plugs in the lights.)


My front door. The wreath was made from a pine wreath and the berries, pine cones and leaves were added.


I added pine boughs to the shelves of my plant stand and hung threes metal stars.

My junk birdhouse, as I call it.  It just has all sorts of old knobs, hinges and wires on it, and I love all of the old things on it.

In my front entry way you are greeted with my Santa on a fish. (Sorry that the picture is blurry.)
Man I must have been having a problem holding the camera still. These are in my piano room and because these nativities are so small I decided to display them on my cake stand.
This one is from Mexico.

This one from , I am thinking Peru or Chile.  The reason I don't know the exact place is that these all came as a set and I liked how they looked, so I am not really sure.  They are made from clay and look like they were hand painted. I got them as a set from E bay from a woman who had been collecting them for years.


This is a view on top of my piano.The reindeer are from pottery barn.

This is on one of my favorite pieces of furniture.  My great grandmothers buffet. (Oops, I forgot to remove the scents y spray before taking the picture.)


The tree in the piano room. Do you remember those glitter balls?

Now into the Dining Room.  These 3 trees are in the corner.

Here is the Dining Room table. And the glitter balls again.
I added a wreath, some feather trees and silver glitter trees.  Oh, and don't forget the antlers!

A view of the table and mantle.

I left the picture that I had hanging and just added a silver dove.  I attached it to the glass with some glue dots that I use for scrap booking.

More glitter and shine!
I am kind of liking the silver and white look.

I added some silver tinsel around the bottom of the steeple houses.

see how it makes those little houses shine!

I didn't add much to the garland,just a pine cone garland, twinkle lights and the silver doves.

Added a few candles to the table. 
I hung this in my kitchen.

This was hand done and was a gift from my daughter.


This is the tree without the flash of the camera on.
This is with the flash.
Now we are downstairs.  This is the tree in the family room.  I added some green glitter fabric garland around the tree and all sizes of green and brown balls.

This is the mantle, I added more cedar garland with twinkle lights, glitter ornaments, and green glitter icicle ornaments.

See those glitter clear icicle ornaments, with three potted trees in front.

The soldiers standing at attention.  I got these as a gift from my daughters, I think they were from Pottery Barn.

Here it is all put together.


This sleigh is used as a table in front of my couch, just added some big pine and red berry balls.

Then I added some pine boughs to this bookcase.

Thanks for visiting!

Sunday, December 4, 2011

It's a marshmallow world...

We had a marshmallow day yesterday.  We had some snow in the morning and then we had marshmallow treats that we made.  We celebrated a birthday, (Mr. Jones) and my daughter brought him some of his favorite treats.  These marshmallow snowmen were for the kids but I thought they were so cute and they were loved by all who ate them!

Cute huh!
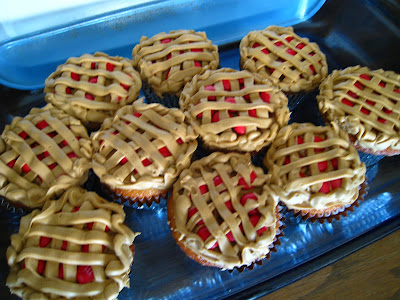
She then made these cupcakes, yes they are cupcakes not little cherry pies. The cherries are red M&M's and the lattice is frosting.

Aren't they adorable! Then she brought pineapples upside down cake, pumpkin bars, and gingerbread cake as well.  It was sugar overload! but it was all delicious.


I told you they were well loved, I had to hurry and snap the picture before they were all gone.

We then made some marshmallow stirring sticks for our neighbors and friends. You start with a marshmallow and dip it in chocolate and then roll it in crushed candy canes.

or if you want crushed toffee bits you can roll it in that!

Put them on a lined cookie sheet pan.
Dip your sucker stick in chocolate and stick it in the marshmallow.

They are all at attention!


Wrap them up. Don't they look delicious!


I made a little tag for them.

Love it when they are all done/
Then I mixed up some hot cocoa mix and put it into containers, to go with the cocoa stirrers. 

Put the directions on the jar.

and now I have my neighbor and friend gifts done. (I hope none of them are reading this.)
They were super fast to make and they are delicious when you stir your hot cocoa with them!

This is a sneak peak of my holiday decorating to come.
Have a great week!


LinkWithin

Related Posts with Thumbnails