Sunday, July 25, 2010

Pillows!

Okay, so now I need some pillows for my guest room! Remember that I was just trying to use what I already have or redo something else. I have soooo many pillows in my house that I wouldn't dare go and buy more. (just ask my husband!) So, I decided to redo some pillows that I already had, I pretty much just used the pillow forms that the pillow covers were in. My inspiration came when I got out some of the lace that I have had for centuries, well not exactly centuries, (I'm not that old.) I have had this lace for a long time, it was some that I bought when a fabric store was going out of business and I knew I could do something with it later. Well, it is later! When I saw it  rolled up on the fabric I had chosen it gave me an idea.

See, doesn't it look like a flower?
For the first 2 pillows I just ran a gathering stitch down the middle of the lace.
Then I just started sewing the gathered lace across the pillow, I didn't measure the lines but if you feel more comfortable measuring, measure out the lines and mark them before sewing.
Here are the 2 pillow tops with sewn lace.
For the next pillow I decided I wanted flowers so I did measure this time and made 9 circles and drew them lightly on the fabric with a pencil.
I gathered this lace at the bottom of the lace instead of the middle and then started the flower on the edge of the pencil line and worked my way in. When I got to the center I rolled the fabric into a tight coil for the center and I tacked the center down with a back and forth stitch to finish it.
Here is one of the flowers finished, only 8 more to go!
I could see that my lace was starting to run low so I thought I better work around the outside and because I didn't have enough to make all of them white another creative idea came and I decided to do the last one black! Sometimes improvisations are the best ideas because when I was finished I loved it!
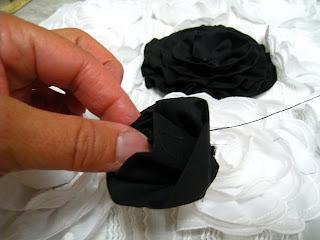
I just used some black fabric because I didn't have any of the black lace to match.  I measured about 2 1/2 inches of the fabric and then fold in half and press with the iron and run a gathering stitch along the edge. I then made the flower  like I did the rest but found when I got to the center that it was easier to finish it by sewing with a needle and thread instead of with the sewing machine.
Here is the finished middle of the flower.
Sew it by hand.
Yes, the black really pops but I think that is what I like the best about it.
It turned out great for the comforter and matches just perfectly!


Here are the 3 finished pillows using what I had in my sewing room. The room is turning out great and can't wait to show you the big reveal!

Tuesday, July 20, 2010

I need some lamps!

I started another decorating project! I decided to make another guest bedroom in my home. When all of the family comes we always can use another bed! The guest bedroom that I have now has a King size bed in it and whoever shows up first seems to get that bedroom. I decided to put another King size bed in another of the bedrooms and I will show you the big reveal when it is all put together. For today I just needed some lamps to go by the bed. In doing this project I decided that I was going to try and use many of the things that I already have in my house. But in redoing the room I decided that a lot of the things that I wanted to use didn't match what I was trying to do so I kind of redid, and recycled, many of the accessories.

Here are the lamps that I started with. I painted the bases white and then needed to do something with the shades.
I went up into my flower room and found these left overs and flowers that I had picked up when they were really cheap at the end of the season.
 I wanted to hide the trim because it wasn't as white as I wanted it to be so I used the flower petal garland and hot glued around the top and the bottom. I had two 4 foot garlands and each one exactly fit around one shade. ( I decided that it was fate, they were meant for the lamp shade!)
I then pulled the flower heads of of the stems and cut the small plastic thing on the bottom of the flower off so it would lie flat on the shade. I then hot glued the flowers onto the shade.
You are going to kind of get a sneak peek of what the finished room is going to look like, With the lamp turned on, the colors on the flowers don't show up as well in the picture, but you get the idea of how great it is going to look!
Here it is with the white base.

That was an easy project and it only cost me the cost of a can of spray paint! I love projects that turn out looking good and the cost is minimal. AND I used what I already had! (My husband loves that part) I have decided that you become more creative when you limit your self to a low budget. When we were poor college students I came up with some of my best ideas! Can't wait to show you the rest of the room!

Tuesday, July 13, 2010

A quick baby gift

I needed a quick baby gift and had these little baby shoes already made, but I needed something summery to go with them and what do babies wear the most in the summer!
You are right! Onesies! So I made a cute flower to go on the onesie so it would match the cute little shoes.
I had these daisy buttons and wasn't sure what to do with the larger one because they were a little too big for shoes but it worked out just right for the center of the flower.

                                              Ahh, just right for a quick baby gift!

Sunday, July 11, 2010

Easy as ABC


I wish that this was as easy as ABC!
I want to show you some work from an amazing artist. This last January my Aunt Colleen passed away after fighting a valiant fight with cancer. I have always admired what a great artist she is and today I want to share with you some of her work. I would really like to see this published into a book because it would be a great way to honor the great artist that she is.
The ABC sketches were from a sketch book that she had.


Did you notice that the "J" was missing? She didn't get to finish the alphabet but I am sure that her daughter who is also an amazing artist would be able to finish for her. (I know that you can do it, Jane.)


So, U,W, X, Y and Z are missing as well.
She also has some amazing water colors!
This one was done in oils and this so reminds me of her. I remember it hanging in her home and admired it every time I visited.
She spent a year and a half in Croatia and she never went anywhere without her sketch book and her small water color set. These next sketches and paintings were done while she was in Croatia.

I love this one! The colors and architecture make me think that I am actually there.
Here is one that she did of her husbands gloves and hat.

There were many roosters in Croatia and I love roosters so this is one of my favorites.
This last weekend I was able to go to a family reunion and I missed having her there. It wasn't quite the same and I guess never will be. She was a very talented lady and has been an inspiration to me my whole life. Many of the things that I have learned came from her, she even helped me make my own wedding cake!

Here is my cake and yes, I know this is really dating me and is totally taking me back in time, but I still love the cake!

She taught me all of the tricks to cake decorating. Because of that I have done many wedding cakes, including  my daughters. So, today I want to pay tribute to this fantastic lady and friend of mine and if she were here I would thank her for all that she taught me and the spark she has been to my inspirations!

Monday, July 5, 2010

Just back from Girl's Camp!

I've been gone this last week and I just wanted to show you all of the fun that I had. We went to YW girl's camp and we didn't go far from home but I decided even though it is just 10 miles from my home that it is one of the most beautiful places on earth. If you remember we made some things before we left to get ready for this great camp. If you missed the medicine bags that we made go Here.


We started out by setting up our tents and decorating our camp. The theme was the "Daughters of Helaman". This comes from ancient America and some of the ancestors of the American Indians. We decided to use this for many of the crafts and things that we did at camp.

We first told a story about a young Indian hand maid who found  different things in the forest and found that they had a significant meaning to her spiritually so she put these items close to her heart and in a small little bag that she hung around her neck so that she would never forget those lessons that she learned. We then went on our 5 mile hike, which ended up being a little more than 5 miles but the girls were great and I didn't hear a single complaint!

When we got back to camp we made our headbands, the girls are so creative and came up with some of the cutest ideas.
We then wove different arm bracelets and these were just as creative!

We decorated large cans that had been spray painted white before hand. After they decorated their own can they were  stacked on a pole outside their tent so we would know what tent everyone was in. We had drilled a hole in the bottom of the can so that they would easily slide on the stake that we had pounded in the ground.
Aren't they cute!
The next day we made dream catchers!
I was surprised how "crafty" these young women are, they loved making these and while we were at it we taught them a few knots!

The dream net has been made
For many generations
Where spirit dreams have played.
Hung above the cradle board,
Or in the lodge up high,
The dream net catches bad dreams,
While good dreams slip on by.
Bad dreams become entangled
Among the sinew thread.
Good dreams slip through the center hole,
While you dream upon your bed.
This is an ancient legend,
Since dreams will never cease,
Hang this dream net above your bed,
Dream on, and be at peace.

Some of the girls decided to hang them onto their headbands.
We usually spent the afternoons passing off YW camp requirements but whenever we could we made the short hike up to the waterfall. I decided that this is Idaho's Hawaii! It was so beautiful and green and the water was just amazing!
We decided that we should have some "photo shoots" of God's beautiful creations.

This looks like something from some tropical paradise but these are just some of the shaded  mossy rocks at the top of the waterfall. Aren't they beautiful!!
This river was so soothing to go to sleep at night!
I love Young Women!


On the last night some girl's decorated my car and gave me a hint, that maybe the first thing I need to do when I got home was, "WASH MY CAR!"
It was a great experience with these wonderful Young Women and I think we have some of the "Funnest", "Spectacular" leaders ever! Thanks for letting me share some of the fun crafty things that we did at camp!
I had to try this out in black and white with just the yellow sun flowers in color. There were fields and fields of these coming back from our hike.