Friday, June 25, 2010

A gift for Violet

My Nephew's wife is going to have a baby girl and she already has a name! They are going to name her Violet, (isn't that the sweetest name!) I had to make sweet Violet a gift and of course I thought it should be Violet!
I made these cute little shoes and decided to put a felted flower on the toe with 3 small beads for the flower center. I then thought I should probably make a hat to match.
I kind of made up the hat pattern but wanted to weave a ribbon through it so I made a double crochet  near the bottom of the hat to weave the ribbon through. I also made a felted flower clip to attach so you can either clip it to the hat, clip it in her hair or clip it to whatever clothing she would be wearing. I think I  have a new favorite color! Violet!
I finished making these cute sunflower shoes as well, I just need to make a hat to match. Oh, wouldn't a large sunflower on the hat look oh, so cute! I better get busy and get working on the hat. You never know when I will need another baby gift!
              Can't wait for Violet to make her arrival!

Monday, June 21, 2010

Finished!


There is a word in decorating which means you change one item in the setting and it leads to something else, something more, and etc. I can't remember what the word is, but with the start of a little paint it just kept me going from one project to the next. (If you know the word, tell me because I think I have that syndrome.)
It all started with a little paint and then I could see all of the possibilities. If you missed the first post go
I had some more yellow paint and I thought how cute this table would look painted.
The table is rather small and I had some old little chairs that were painted that forest green that was popular several years ago. Why not paint them all Yellow!!


The table came apart which made my job sooo much easier.
Here are the miniature green Adirondack chairs.


I then thought how cute the glass top table would look with some sort of design on it. But, how was I going to do that? Because it will be outside, it would need to be something that would stand up to the weather.
I had some paper with the colors I thought would look good with the yellow.
Why not tile it with Paper!! But, how would that work with rain and water hitting it?
Because it is glass I did all of the work from the underneath side and you guessed it!
Mod Podge, baby!!

After getting all of the little squares cut and putting the large "J" in the center, I then put another coat on the back side.
But, how would I grout this paper tile, I thought of using paper but then thought, "I will use Paint!"
Here is the grouting process, I taped off the edge of the table so the beige would not get on my yellow paint.


Here are those ugly green chairs, don't they look so much better yellow!

Here is my little table and chairs, I know they will get well used when the grand kids come!

I love how they turned out!
On to the next painting project. You kind of got a glimpse of it in the previous picture. Here is that forest green paint again.
Why not change it to a lovely metallic brown!
What about my weathered old umbrella?? (It was a light teal color.)
Why not paint that too!! Doesn't it look so much better this burnt orange color! I actually had 2 cans of this paint in my shed and I think it was the perfect color for the umbrella. It is an outdoor paint so I will see how it holds up.
Oh, and I thought about recovering my old cushions but when I went to check out the fabric it was $19.00 a yard and I have had the cushions for 15 years so I thought it was probably time for some new ones! I looked at quite a few places to try and find the right colors to match my new decor and believe it or not I found these perfect cushions in the store that is in every city in America. (Yes, it is the "W" store.) Some times I am amazed what you can find there. It was cheaper to buy the new cushions, instead of recovering the old ones.
I wanted to get this all done by Fathers' day and I reached my goal!

So, here it is all finished! It just feels so good when a project is all finished, (or is it? I might find something else to paint!)
I had to paint these 2 obelisks, and they were painted the avocado green.
I pulled out this old plant stand, and of course it needed some paint!
Can't wait until these plants grow big! ( Ooh, maybe I need to paint the pots yellow!)

Ahhh, it feels good to be finished, or am I?  No, if you look close you can see I didn't have enough stain to finish the last step on the deck. I guess I am off to the paint store to get some more stain! See you later!!!

Linking to these parties on my sidebar!

Wednesday, June 16, 2010

Waiting for the weather!


The weather has been so cold and rainy that I haven't been able to finish my outside project. So, I decided to finish a hat I have made for a great photographer! You can check out her photography at this site http://bouncinbabyphotography.com/
I love her pictures and this hat is going to look so cute on her cute little clients!

I did take a picture of my cute grand daughter and the hat is knitted and is very stretchy so it would fit most any little head size.
It could be worn just plain.
I have made these clips that can be interchangeable on the hat, so you get a different look with each one.

This one is more of a spring color.
I like the black and white because it really makes the colors pop!
This is a double row crocheted flower.

Here is the single row flower that is crocheted. I like how it turned out and can't wait to see it on a cute little newborns head! Maybe the sun will come out today so I can finish my outside projects!!

Wednesday, June 9, 2010

What a little paint can do!


I decided to plant flowers in my pots on Saturday and I was successful in getting most of them done. When I went out to my shed though, there were many old pots,containers and plant stands that I have not used for a long time because they are looking old and needed some rejuvenation! Every year I think about pulling them out and giving them some TLC but another season comes and goes and I end up buying something to replace them. I couldn't stand to get rid of them because I still love the shapes and designs of these neglected treasures.
These shelves have been used to store all of my old clay pots and gardening containers so they were getting pretty neglected. I drug them out and gave them a good cleaning!
I haven't used these in several years, they were still in great shape but I was not liking the color.
These are usually on my deck but they have seen several years and the cushions could use some updating too! I took the cushions off to paint so I didn't get a picture with the cushions on.

I have quite a collection of clay pots because I am not sure where and what I want to plant so I use some and save some for the next year. As you can see these have been well used.
I actually found a great deal on this yellow paint at HL and so I bought what they had and then decided the pots would look great YELLOW!
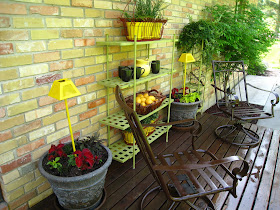
I painted the plant shelves, avocado and the chairs a dark brown. I love the new transformation and they all found a new home on my back deck.
I painted everything in site! I am still thinking there are more poor items in the shed that need the same rejuvenating.
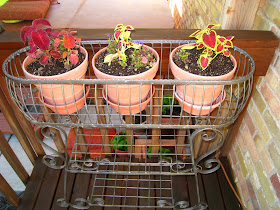
I painted the wire plant holders a rusty red, actually it was primer but I liked the look so much I just left it with the primer on! The direction sphere or what ever it is called, on the narrow plant stand,(what is the name for it?) I painted  brown with a metallic top coat.
I am really liking the yellow pots in there (NEW) container.
It just makes me want to make some lemonade and sit down and have a break for a minute!
I didn't get a before picture of these yellow lanterns but they were in pretty bad shape! They are looking great with their new yellow coat.


I have to give my daughter Caitlin some credit for helping me break out of my "boring colors" and really you can choose almost any color when it comes to outside decorating!
Come back and see what else I have planned for my yellow paint!